> ## Documentation Index
> Fetch the complete documentation index at: https://docs.magpipe.ai/llms.txt
> Use this file to discover all available pages before exploring further.
# Settings
> Configure your account, organization, and preferences
## Overview
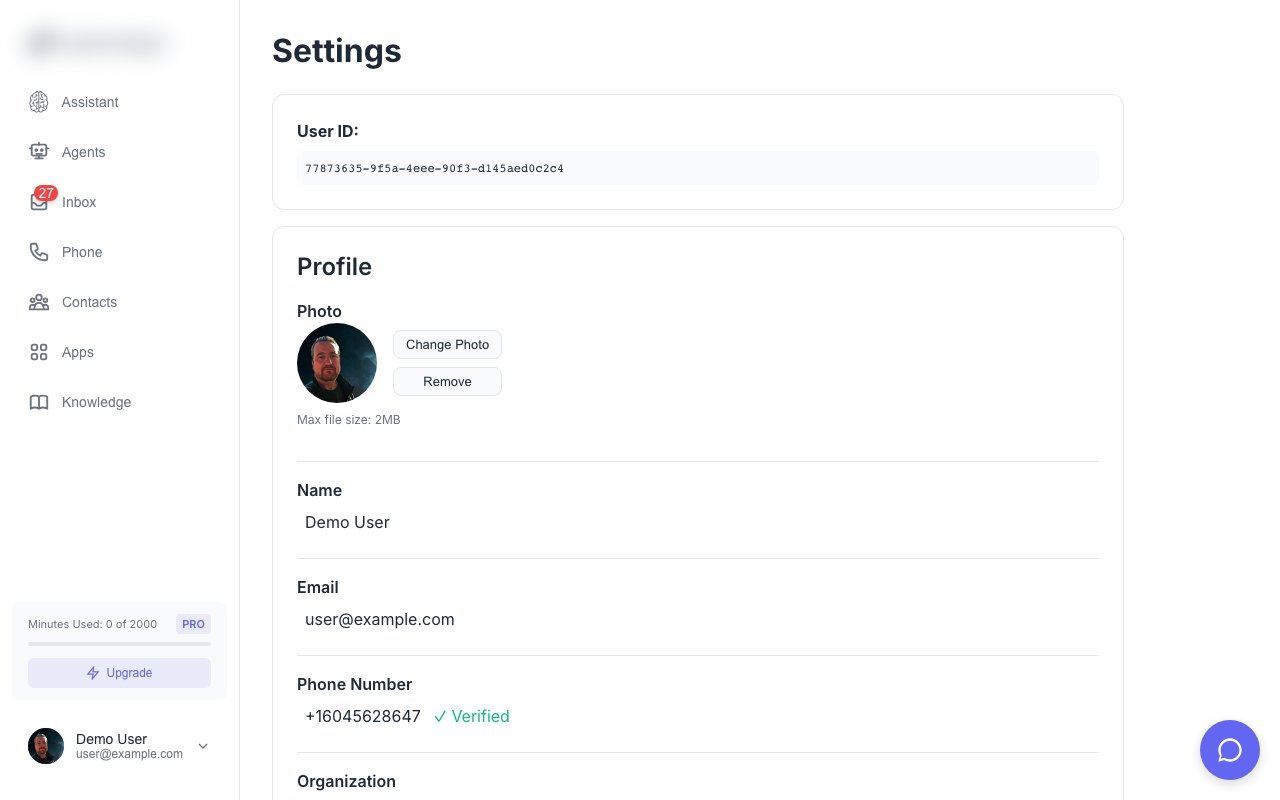
Settings is your control center for configuring Magpipe. Manage your account, organization, team members, branding, notifications, and more. Access Settings from the main navigation menu.
 ## Account Settings
### Profile
Your personal account information:
| Setting | Description |
| ------------ | --------------------------------- |
| **Name** | Your display name |
| **Email** | Account email (login) |
| **Phone** | Your phone number (for transfers) |
| **Avatar** | Profile picture |
| **Timezone** | Your local timezone |
### Changing Email
1. Go to **Settings** → **Account**
2. Click **Change Email**
3. Enter new email address
4. Verify via email link
5. New email becomes your login
### Password
1. Go to **Settings** → **Account**
2. Click **Change Password**
3. Enter current password
4. Enter new password (twice)
5. Save
**Password requirements:**
* Minimum 8 characters
* At least one uppercase letter
* At least one number
### Two-Factor Authentication
Add extra security with 2FA:
Go to **Settings** → **Security** → **Enable 2FA**.
Use an authenticator app (Google Authenticator, Authy, etc.).
Enter the 6-digit code from your app.
Save the backup codes in a secure location.
### Delete Account
Deleting your account is permanent. All data including agents, calls, and contacts will be lost.
1. Go to **Settings** → **Account**
2. Scroll to **Danger Zone**
3. Click **Delete Account**
4. Type your email to confirm
5. Click **Permanently Delete**
## Organization Settings
### General
Configure your organization:
| Setting | Description |
| --------------- | ------------------------- |
| **Name** | Organization display name |
| **Description** | Internal description |
| **Logo** | Organization logo |
| **Website** | Your website URL |
### Default Agent
Set a fallback agent for calls to numbers without an assigned agent:
1. Go to **Settings** → **Organization**
2. Find **Default Agent**
3. Select an agent from dropdown
4. Save
### Timezone
Set the organization timezone for:
* Call scheduling
* Agent business hours
* Report date ranges
## Team Settings
### Viewing Team Members
Go to **Settings** → **Team** to see:
* All organization members
* Their roles (Owner, Admin, Member)
* Invitation status (pending/accepted)
* Last active date
### Inviting Members
1. Click **Invite Team Member**
2. Enter email address
3. Select role (Admin or Member)
4. Send invitation
See [Team Management](/features/team-management) for full details.
### Changing Roles
1. Find the team member
2. Click their role
3. Select new role
4. Confirm change
### Removing Members
1. Find the team member
2. Click **Remove**
3. Confirm removal
## Branding Settings
### Logo
Upload your logo for white labeling:
1. Go to **Settings** → **Branding**
2. Click **Upload Logo**
3. Select image file (SVG or PNG)
4. Preview and save
### Colors
Customize your brand colors:
| Setting | Usage |
| ------------------- | ----------------------- |
| **Primary Color** | Buttons, links, accents |
| **Secondary Color** | Borders, backgrounds |
Enter hex codes (e.g., `#6366f1`) or use the color picker.
### Product Name
Replace "Magpipe" with your brand:
1. Enter your product name
2. Save changes
3. Name appears in browser title and UI
### Custom Domain
Set up your own domain for the dashboard. See [White Labeling](/features/white-labeling) for instructions.
## Notification Settings
Notification preferences are configured **per-agent** in the **Agent Detail** → **Notifications** tab. Each agent can have independent Email, SMS, Push, and App notification settings.
See [Agent Notifications](/features/agent-notifications) for details on configuring notification channels.
## Phone Settings
### Transfer Number
Set the default number for call transfers:
1. Go to **Settings** → **Phone**
2. Enter your **Transfer Number**
3. Optionally set a **Transfer Passcode**
4. Save
When an agent transfers a call, it goes to this number.
### Caller ID
Configure outbound caller ID:
* Calls show your Magpipe number
* Choose which number to display
* Verified numbers only
### Call Recording
Toggle call recording on/off:
1. Go to **Settings** → **Phone**
2. Toggle **Record Calls**
3. Save
Check local laws regarding call recording and consent requirements.
### Recording Retention
Set how long recordings are kept:
| Option | Description |
| ----------- | ------------------ |
| **30 days** | Minimum retention |
| **90 days** | Default |
| **1 year** | Extended retention |
| **Forever** | Never delete |
## Data & Privacy
### Data Export
Download all your data:
1. Go to **Settings** → **Data**
2. Click **Export All Data**
3. Wait for export to process
4. Download ZIP file
Export includes:
* Contacts (CSV)
* Call history (CSV)
* Messages (CSV)
* Agent configurations (JSON)
* Knowledge base content (JSON)
### Data Retention
Configure automatic data cleanup:
| Data Type | Options |
| ------------------- | ------------------------- |
| **Call Recordings** | 30d / 90d / 1yr / Forever |
| **Transcripts** | Match recordings |
| **Chat Sessions** | 90d / 1yr / Forever |
| **Analytics** | 1yr / Forever |
### GDPR Requests
Handle data subject requests:
* **Access Request**: Use Data Export
* **Deletion Request**: Delete contact + associated data
* **Portability**: Export in standard formats
## API Settings
### API Keys
Generate and manage API keys for programmatic access to the Magpipe REST API. Keys use the `mgp_` prefix and persist until revoked.
**Generating a key:**
1. Go to **Settings** → **API**
2. Click **Generate New Key**
3. Enter a descriptive name (e.g., "Production Server")
4. Copy the full key immediately — it is only shown once
5. The key appears in your keys list showing the prefix (`mgp_abc12345...`)
The full API key is only displayed at creation time. If you lose it, you'll need to generate a new one.
**Managing keys:**
| Column | Description |
| ------------- | ------------------------------------------------- |
| **Name** | Descriptive label you assigned |
| **Key** | First 8 characters (`mgp_...`) for identification |
| **Created** | When the key was generated |
| **Last Used** | When the key was last used in an API request |
| **Actions** | Revoke button to permanently disable the key |
**Limits:** Maximum 10 active API keys per account.
**Using a key:** Include it as a Bearer token in the `Authorization` header:
```bash theme={null}
curl -X POST "https://api.magpipe.ai/functions/v1/list-agents" \
-H "Authorization: Bearer mgp_your_key_here" \
-H "Content-Type: application/json" \
-d '{}'
```
See [Authentication](/api-reference/authentication) for full details on API keys vs session tokens.
## Billing Settings
### Current Plan
View your subscription:
* Plan name and features
* Billing cycle
* Usage this period
* Next billing date
### Usage
Monitor your usage:
* Minutes used (voice)
* SMS sent/received
* API calls made
* Storage used
### Payment Method
Manage payment:
1. Go to **Settings** → **Billing**
2. Click **Payment Method**
3. Add or update card
4. Set as default
### Invoices
View and download invoices:
* All past invoices available
* Download PDF
* Auto-emailed monthly
### Cancel Subscription
1. Go to **Settings** → **Billing**
2. Click **Cancel Plan**
3. Select reason (optional)
4. Confirm cancellation
Cancellation takes effect at end of billing period. Data is retained for 30 days after cancellation.
## Preferences
### Language
Select your interface language:
* English (default)
* More coming soon
### Date Format
Choose date display format:
* MM/DD/YYYY (US)
* DD/MM/YYYY (International)
* YYYY-MM-DD (ISO)
### Theme
Select UI theme:
* Light (default)
* Dark
* System (match OS)
### Keyboard Shortcuts
View and customize keyboard shortcuts. Enable/disable globally or customize specific shortcuts.
## Troubleshooting
### Settings Not Saving
1. Check internet connection
2. Refresh the page
3. Try a different browser
4. Clear browser cache
### Permission Denied
If you can't access certain settings:
* Verify your role (some settings require Admin/Owner)
* Check organization permissions
* Contact your organization Owner
### Missing Features
Some settings require specific plans:
* White labeling: All plans
* Custom domain: Contact support
* Extended retention: Pro and above
Manage team members
Customize branding
## Account Settings
### Profile
Your personal account information:
| Setting | Description |
| ------------ | --------------------------------- |
| **Name** | Your display name |
| **Email** | Account email (login) |
| **Phone** | Your phone number (for transfers) |
| **Avatar** | Profile picture |
| **Timezone** | Your local timezone |
### Changing Email
1. Go to **Settings** → **Account**
2. Click **Change Email**
3. Enter new email address
4. Verify via email link
5. New email becomes your login
### Password
1. Go to **Settings** → **Account**
2. Click **Change Password**
3. Enter current password
4. Enter new password (twice)
5. Save
**Password requirements:**
* Minimum 8 characters
* At least one uppercase letter
* At least one number
### Two-Factor Authentication
Add extra security with 2FA:
Go to **Settings** → **Security** → **Enable 2FA**.
Use an authenticator app (Google Authenticator, Authy, etc.).
Enter the 6-digit code from your app.
Save the backup codes in a secure location.
### Delete Account
Deleting your account is permanent. All data including agents, calls, and contacts will be lost.
1. Go to **Settings** → **Account**
2. Scroll to **Danger Zone**
3. Click **Delete Account**
4. Type your email to confirm
5. Click **Permanently Delete**
## Organization Settings
### General
Configure your organization:
| Setting | Description |
| --------------- | ------------------------- |
| **Name** | Organization display name |
| **Description** | Internal description |
| **Logo** | Organization logo |
| **Website** | Your website URL |
### Default Agent
Set a fallback agent for calls to numbers without an assigned agent:
1. Go to **Settings** → **Organization**
2. Find **Default Agent**
3. Select an agent from dropdown
4. Save
### Timezone
Set the organization timezone for:
* Call scheduling
* Agent business hours
* Report date ranges
## Team Settings
### Viewing Team Members
Go to **Settings** → **Team** to see:
* All organization members
* Their roles (Owner, Admin, Member)
* Invitation status (pending/accepted)
* Last active date
### Inviting Members
1. Click **Invite Team Member**
2. Enter email address
3. Select role (Admin or Member)
4. Send invitation
See [Team Management](/features/team-management) for full details.
### Changing Roles
1. Find the team member
2. Click their role
3. Select new role
4. Confirm change
### Removing Members
1. Find the team member
2. Click **Remove**
3. Confirm removal
## Branding Settings
### Logo
Upload your logo for white labeling:
1. Go to **Settings** → **Branding**
2. Click **Upload Logo**
3. Select image file (SVG or PNG)
4. Preview and save
### Colors
Customize your brand colors:
| Setting | Usage |
| ------------------- | ----------------------- |
| **Primary Color** | Buttons, links, accents |
| **Secondary Color** | Borders, backgrounds |
Enter hex codes (e.g., `#6366f1`) or use the color picker.
### Product Name
Replace "Magpipe" with your brand:
1. Enter your product name
2. Save changes
3. Name appears in browser title and UI
### Custom Domain
Set up your own domain for the dashboard. See [White Labeling](/features/white-labeling) for instructions.
## Notification Settings
Notification preferences are configured **per-agent** in the **Agent Detail** → **Notifications** tab. Each agent can have independent Email, SMS, Push, and App notification settings.
See [Agent Notifications](/features/agent-notifications) for details on configuring notification channels.
## Phone Settings
### Transfer Number
Set the default number for call transfers:
1. Go to **Settings** → **Phone**
2. Enter your **Transfer Number**
3. Optionally set a **Transfer Passcode**
4. Save
When an agent transfers a call, it goes to this number.
### Caller ID
Configure outbound caller ID:
* Calls show your Magpipe number
* Choose which number to display
* Verified numbers only
### Call Recording
Toggle call recording on/off:
1. Go to **Settings** → **Phone**
2. Toggle **Record Calls**
3. Save
Check local laws regarding call recording and consent requirements.
### Recording Retention
Set how long recordings are kept:
| Option | Description |
| ----------- | ------------------ |
| **30 days** | Minimum retention |
| **90 days** | Default |
| **1 year** | Extended retention |
| **Forever** | Never delete |
## Data & Privacy
### Data Export
Download all your data:
1. Go to **Settings** → **Data**
2. Click **Export All Data**
3. Wait for export to process
4. Download ZIP file
Export includes:
* Contacts (CSV)
* Call history (CSV)
* Messages (CSV)
* Agent configurations (JSON)
* Knowledge base content (JSON)
### Data Retention
Configure automatic data cleanup:
| Data Type | Options |
| ------------------- | ------------------------- |
| **Call Recordings** | 30d / 90d / 1yr / Forever |
| **Transcripts** | Match recordings |
| **Chat Sessions** | 90d / 1yr / Forever |
| **Analytics** | 1yr / Forever |
### GDPR Requests
Handle data subject requests:
* **Access Request**: Use Data Export
* **Deletion Request**: Delete contact + associated data
* **Portability**: Export in standard formats
## API Settings
### API Keys
Generate and manage API keys for programmatic access to the Magpipe REST API. Keys use the `mgp_` prefix and persist until revoked.
**Generating a key:**
1. Go to **Settings** → **API**
2. Click **Generate New Key**
3. Enter a descriptive name (e.g., "Production Server")
4. Copy the full key immediately — it is only shown once
5. The key appears in your keys list showing the prefix (`mgp_abc12345...`)
The full API key is only displayed at creation time. If you lose it, you'll need to generate a new one.
**Managing keys:**
| Column | Description |
| ------------- | ------------------------------------------------- |
| **Name** | Descriptive label you assigned |
| **Key** | First 8 characters (`mgp_...`) for identification |
| **Created** | When the key was generated |
| **Last Used** | When the key was last used in an API request |
| **Actions** | Revoke button to permanently disable the key |
**Limits:** Maximum 10 active API keys per account.
**Using a key:** Include it as a Bearer token in the `Authorization` header:
```bash theme={null}
curl -X POST "https://api.magpipe.ai/functions/v1/list-agents" \
-H "Authorization: Bearer mgp_your_key_here" \
-H "Content-Type: application/json" \
-d '{}'
```
See [Authentication](/api-reference/authentication) for full details on API keys vs session tokens.
## Billing Settings
### Current Plan
View your subscription:
* Plan name and features
* Billing cycle
* Usage this period
* Next billing date
### Usage
Monitor your usage:
* Minutes used (voice)
* SMS sent/received
* API calls made
* Storage used
### Payment Method
Manage payment:
1. Go to **Settings** → **Billing**
2. Click **Payment Method**
3. Add or update card
4. Set as default
### Invoices
View and download invoices:
* All past invoices available
* Download PDF
* Auto-emailed monthly
### Cancel Subscription
1. Go to **Settings** → **Billing**
2. Click **Cancel Plan**
3. Select reason (optional)
4. Confirm cancellation
Cancellation takes effect at end of billing period. Data is retained for 30 days after cancellation.
## Preferences
### Language
Select your interface language:
* English (default)
* More coming soon
### Date Format
Choose date display format:
* MM/DD/YYYY (US)
* DD/MM/YYYY (International)
* YYYY-MM-DD (ISO)
### Theme
Select UI theme:
* Light (default)
* Dark
* System (match OS)
### Keyboard Shortcuts
View and customize keyboard shortcuts. Enable/disable globally or customize specific shortcuts.
## Troubleshooting
### Settings Not Saving
1. Check internet connection
2. Refresh the page
3. Try a different browser
4. Clear browser cache
### Permission Denied
If you can't access certain settings:
* Verify your role (some settings require Admin/Owner)
* Check organization permissions
* Contact your organization Owner
### Missing Features
Some settings require specific plans:
* White labeling: All plans
* Custom domain: Contact support
* Extended retention: Pro and above
Manage team members
Customize branding